Monday, February 09, 2015

Let the Gardening Begin

Every year, right around the end of January, I begin thinking what I'd like to do in the garden for the season.  I always have lots of ideas running through my head, and I'm usually able to translate a few of those and make them work in the garden.

… at least for a little while.
                                   
Then, suddenly it's the middle of summer and what was easy to care for in the spring, has become unbearable to care for in the blazing heat of the summer sun.  I know this, and yet, I'm ever the eternal optimist that this will be the year!  With that in mind, we've made some physical changes in the backyard garden area that we're hoping will be more inspirational to keep us going during the hotter months.  To wit, we removed a large palm tree that was beginning to lean a bit and tangle in the wires that cross the back of the property.  We were afraid that we might lose it in a powerful wind storm and, if so, it would cause a great deal of damage to the retaining wall that surrounds it, as well as the swimming pool.  We also removed a sago palm that's been there for years.  Our original thought was to re-plant the sago in place of the palm tree, but when we discovered that the pods it sheds are poisonous to animals, so we knew that would have to go too.

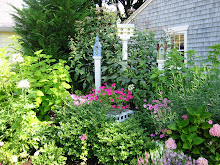
This year, I decided to sketch things out a bit before we did any planting.  I'm not really much of an artist, but I have to say that it was a fun task deciding where to put the herb garden, where the lettuces would grow best, and where to plant the hummingbird garden.  I thoroughly enjoyed sketching all of the different shades of green and adding some flowers for pops of colors.

I've also been thinking about some decor I'd like to add here and there to punch things up in the planters, as well as a rather dull redwood fence that outlines the sides of the yard.  Each year I add a few pieces of Talavera pottery to add splashes of color.  I have several planters as well as a beautiful bird bath.  This year I'm going to focus on buying some things that will add splashes of color to the fence.  I already had several terra cotta sun faces and decided to gather and hang them in one area of the fence; I added a large Talavera sun face to this area and I think it's the perfect addition.  I also found a climbing frog that we positioned on another area of the fence.  He looks a bit lonely and will need some mates, so I'll be looking for several more to add to this area.  On the other side of the yard we already have five large. open work wrought iron stars.  I'm going to add small battery pack lights to each of the stars for a little more sparkle at night, and I found some Talavera stars to intersperse in this area as well.

I love adding all of these fun things to the garden, but it does get a little expensive!  This weekend, however, I thought of a really wonderful addition to the garden that won't cost us one dime.  I thought of a clever way to use something we already had outside that hasn't been used in years, and I'm really excited about it!  Years ago dad received a small outdoor fountain as a gift.  He put the pump together and used it for about a year or so, and then stopped using it.  I'm not sure if the pump broke and needed to be replaced, or if he just didn't want to deal with the hassle of it, but it's been sitting in the same spot on the patio for years now without a purpose.  I don't know why I didn't think about this before, but it suddenly hit me over the weekend - why don't we 'cut the cord' (literally and figuratively!), turn the fountain into a planter, and move it to the garden area?!  There isn't a lot of room to plant anything, but I believe the basket the little girl is holding will be just deep enough for impatiens.  The fountain is similar to this one, but not exactly.  Anyway, it's enough for you to get the idea.  Fun, right?!
I think next weekend we'll actually begin some planting!  I have a few things to start from seed, but we'll also be buying some additional herbs, a few veggies and some flowers.  We've decided to add a large fern to the area where the palm tree formerly lived and we will surround that with … well, I guess I have a little more dreaming to do to figure that out!

A bee-bop, a boo-bop, a rhubarb pie!

A couple of weeks ago I was discussing pie with a co-worker.  Why?  I can't really remember what sparked the conversation, but I did glean a lot of really useful information!

I mentioned that I wasn't happy with the way my pies came out over the holidays.  He asked why and I said that, though the fillings were delicious, the crusts left much to be desired.  He said that, during his college years, he worked at a coffee shop called Polly's Pies, and he remembered baking an absolute TON of pies.  He said that for each pie crust, they would pre-bake the bottom crust by pricking the bottom of the crust with a fork, and then placing another pie pan over the crust instead of pie weights.  He said not only did this keep the pie crust from puffing on the bottom (as the any pie weight would do), the heat of the second pan helped bake the top of the bottom crust.  Huh.  I'd never even thought of that!  For that matter, I'd never used pie weights to pre-bake a pie crust (I know - shame on me!).

After that conversation I felt I had much to learn about pie baking, so I did a little investigation.  Each holiday season I use a variety of pie pans to bake my pies.  I did an internet search to see if there were recommendations on the best pie pans, and yep, indeed there were!  Not only that, I discovered that different types of vessels require more or less baking time depending on whether it's glass, ceramic or tin.  You would have thought that I would have known that after all of these years, but nope, in fact I'd never even given it a second thought.  No wonder I have iffy luck with my pies!

So.  With all of my new found knowledge, I baked a pie yesterday.  I knew what kind I was in the mood for ... what I couldn't stop thinking about, but I wasn't sure that Kevin would agree.  When I mentioned it to him, he got a huge smile and said "YES!".  YAHOO!  Rhubarb it is!  All I could think of were those delicious sweet/tart pies that grandma Maxwell used to bake.  They had the most delicious, flakey crust, and the filling was soo delicious, it would be both sweet and make your mouth pucker with it's tart flavor all at the same time.  Mmmm.  Pure deliciousness!

I used the clear glass pie plate that received the best reviews.  I couldn't find a pan that fit inside the pie plate, so I did end up using dried beans as pie weights - and they worked out just fine.  I used tapioca instead of cornstarch in the filling because that's what grandma always used.  I set the timer shy of the time indicated just to make sure it wouldn't burn.  I added time when it was clear that the pie wasn't quite baked to perfection yet.  And waited.  Patiently.  Sort of.

About 55 minutes later, I was rewarded with a golden brown pie whose crust appeared to be quite flakey and oozed just the right amount of pink sticky liquid over the side of the glass pan.  About an hour after dinner, we cut into the pie.  I was a bit nervous, but lo and behold, it was probably THE best pie I've ever made! The crust was perfectly done on the bottom - not doughy.  The sweet/tart filling was just as I remembered.  Warm pie served with a little side of vanilla ice cream that was just beginning to melt.  Oh man.  My mouth is watering just thinking about it!

It's funny how conversations evolve.  How just taking a few minutes to engage in a light-hearted discussion with a friend made me a better baker.  It allowed me learn something new from my friend and prompted me to get seek out some insight into a topic on which I thought I was pretty well versed.  It's true: you (CAN) learn something new every day!